Sometimes you know you’re into a world of hurt, but you dive in head first anyway.
In the past
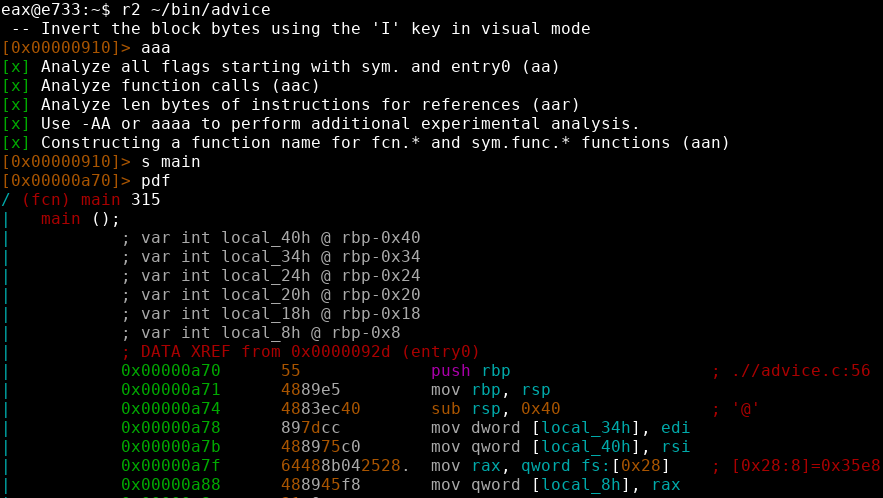
The first proper encounter with the Z80 for me was about one year ago when a programmer from the Amstrad CPC scene asked if anyone would like to convert his tracker to the Atari ST. Since nobody seemed interested and personally I saw potential in a tracker that runs on modern computers but produces music for the ST, I jumped in and did it. You can find the results here.
I won’t go into details here, that’s a whole other article yet to be written. Suffice to say that the source (about 1200 lines of code including comments) was hand ported to the ST.
The game
At around December 2018 I was having a discussion with SPKR from SMFX, exchanging titles we’ve played on the ZX Spectrum. I admit I haven’t played too many of them apart from the usuals like Jetpac. Maziacs was certainly mentioned, so I downloaded a copy from World of Spectrum and had a go. It really seemed like a fun game to me - it shouldn’t be hard to port to ST!
…or well, where’s the fun into doing yet another approximate port and spending ages trying to nail the gameplay to behave exactly like the original?
Sinister thoughts started to form inside mind…
Could “just” disassemble original source and then hand convert it to 68000…
But then “happy” memories from Arkos Tracker came back to haunt me… memories of pain and suffering and butthurt…
…one of which though was that during Arkos conversion I did kind of have some ready-made snippets of code I would copy and paste to convert specific instructions, as there was no need to re-invent the wheel every single time (EXX, anyone?)
So, weeeeeeeell, I could probably do the same using an automated tool? Provided I sandboxed enough the converted opcodes in order to behave like on Z80?
And I could probably find the routines where the game draws graphics, plays audio and reads keyboard/joystick?
Slowly this started to sound viable. I’d have to read up on how the Spectrum works, but probably won’t need a ton of details.
So it was decided, I’d do this for fun and profit (well, mostly SPKR’s profit, but that’s details!)
Before going further, I’d like to mention that while searching through my archives I did find a version of maziacs for the ST, written in Omikron Basic, and even with source code. But a) it’s mono only, b) needs TOS 1.0! So that wasn’t too practical for us!
Scope of this article
This is going to be a quite techincal document, i.e. super boring. Do not read unless you want to try something like this for yourself and avoid the common pitfalls. Or you want a good laugh in my expense. Of course you can just skip to the end for some candid memories from Outline 2019. (or when things go wrong)
Also, do note that I do not claim to be an expert in Z80, so please report any errors or anything that looks wrong so I can fix it. (not that I’m good at 68000 either - leave your comments at the end of the article if you spot something that can be improved!)
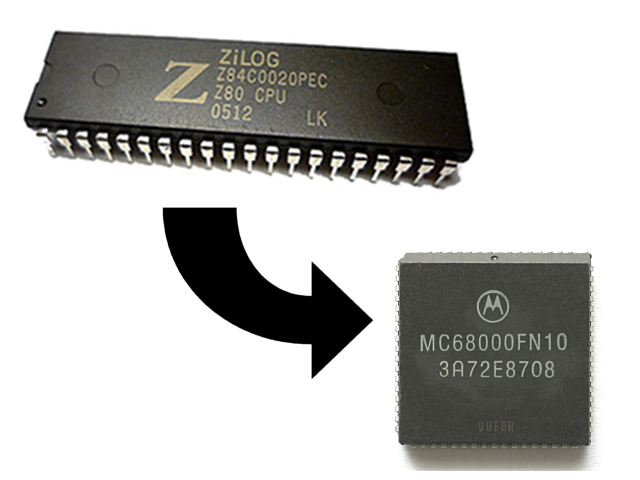
CPU comparison
In general the Z80 processor tries to be compatible with the Intel 8080 (in fact, reading around the net suggests that 8080 binaries can pretty much run on Z80 as well with little or no alterations). This of course does not fare well for our project as the MC68000 is quite different compared to the 8080. Some key differences:
| Z80 | 68000 | |
|---|---|---|
| Registers | 8 8-bit registers that can be combined into 4 16-bit | 8 32-bit general purpose registers and 8 32-bit registers specialised for pointer use (although they are versatile), 2 specialised registers for indirect access |
| All 8-bit registers can be read and written independently | Only the 8 LSBs from each register can be read and written | |
| 8 “shadow” registers that can be swapped with the “main” registers programmatically | No equivalent | |
| Status bits | “Load” and “Store” instructions do not affect CPU status | “Load” and “Store” instructions affect CPU status |
| Carry flag affected only by ALU instructions | Carry flag affected also by non ALU instructions - existance of X flag | |
| Memory | Little Endian (D’oh!) | Big Endian |
| Instructions | Most instructions other than ALU are hardcoded to specific registers | All instructions work equally on data or address registers (if they are allowed) |
| Instructions sizes can be 1, 2, etc bytes | Instructions are multiples of 2 bytes | |
| Hardware access | Uses ports with special instructions to send data to and from | All peripherals are memory mapped. |
I’m not going to rathole on this subject too much, so no exhaustive lists here. What’s written above is enough to explain some archtectural decisions that were made for the converter.
The converter
Register representation
One of the most crucial decisions was made early on: how to model the registers on the 68000? The temptation was there to just use 4 data registers for the main 8 Z80 registers and then do some “magic” in order to be able to access all data independantly. To illustrate the point, here is how the Z80 registers are structured:
| Register | Description |
|---|---|
| A F | Accumulator, Flags (not normally accessible from code) |
| B C | Registers B, C. BC can be used as a 16-bit loop counter |
| D E | Registers D, E. DE can be used as a 16-bit pointer |
| H L | Registers H, L. HL can be used as a 16-bit pointer |
The 68000 instructions are all 32-bit wide, which means that we could easily fit a pair of Z80 registers into one 68000 register. However, as stated above in the table, on the Z80 either of the two registers that make up the pairs can be accessed without problems. So it’s quite legal to do something like “adc a,b”. On the 68000 one can only access the lower 8, 16 or full 32 bit of any register. So our Z80 example above becomes:
rol.w #8,d0 ; d0 holds AF - bring A into the lower byte
rol.w #8,d1 ; d0 holds BC - bring B into the lower byte
add.b d1,d0 ; remember: Z80 syntax is inverse to 68000!
rol.w #8,d0 ; bring A and F back to their proper place
rol.w #8,d1 ; bring B and C back to their proper place
Frankly this doesn’t look that great. Worst case we’re looking 5 instructions just to emulate one. Even if we remove out of the equation CPU frequencies and instruction execution speeds, this still doesn’t look great. There might be some clever trickery one could do with the stack register on the 68000 but I never dug deep into it, because this simply looked very ugly. So even using some arcane magic one could bring this down to 3 instructions (for example), it’ll still be bad. Another intreresting point to make here is that A is used a lot in Z80 code, which means that for (ballpark value) 60% of instructions we would be forced to do ugly rol.w instructions just to get A into place.
Actually this was a very time consuming part while porting Arkos Tracker 2 to the ST. Eventually all the rol instructions were optimised out by simply gaining understanding what the code was trying to do, but still the source code was rather small (about 1200 lines including comments). Here we’re realistically facing anything above 6 thousand. If all these rol instructions inflict a massive performance hit (which is quite likely) then a lot of hand optimising and register shuffling would have to be done. And of course there’s no guarantee that hand fixes would be correct everywhere. And, to throw yet another spanner in the works, since we are in the planning stages with little Z80 experince it’s highly probable we make a misconception or two regarding to the precise function of instructions. Imagine then making a mistake in the emulation somewhere and then going back to hand optimise everything again. Urgh!
What could we do alternatively then? Well, RAM.
Let’s explain why before the angry lynch mob comes at us. Of course it sounds really bad in performance, but if you consider all the points above, more or less all problems go away when we use memory instead of registers. Want to access high or low bytes? No problem, just read them from RAM! Code complexity? Very low as most ALU instructions on 68000 work on memory as well as registers.
So in the end, yucky as it sounds, using RAM for registers actually looked like the most viable solution. There’s a small thing we can do to ease the sobbing a bit: Use low RAM to store the registers, because then access times become a bit faster. Probably 4 cycles/instruction, but hey - every little bit helps. And since we’re looking that most emulated instructions will have something to do with accessing the registers, it’s one of the most critical paths, so we might as well get all the easy performance gains we can from the get go.
The area to store the registers was decided to be an area that TOS very rarely uses. Quoting hardware.txt:
##############System Crash Page                                    ###########
-------+-----+-----------------------------------------------------+----------
$000380|long |Validates System Crash Page if $12345678             |proc_lives
$000384|.....|Saved registers D0-D7                                |proc_dregs
$0003A4|.....|Saved registers A0-A7                                |proc_aregs
$0003C4|long |Vector number of crash exception                     |proc_enum
$0003C8|long |Saved USP                                            |proc_usp
$0003CC|.....|Saved 16 words from exception stack                  |proc_stk
So by the looks of the descriptions these addresses won’t be needed in normal use. So we’re clobbering $384 onwards for our own purposes.
Memory access
A few things to consider here, with one of the main ones being endianness. When accessing bytes both CPUs have no problem, but when it’s time to read or write 16-bit values things get ugly. A very easy solution here would have been to simply swap endianess when the 68000 fetches a word from RAM or before writing to RAM. However we’d like to avoid that if possible, just like above. Fortunately we can leverage the power of the disassembler to our advantage here. Since it is very likely that memory addresses that 16 bit values get stored will only contain 16 bit values (it’s not guaranteed of course but it won’t affect our implementation). Since the disassembler not only decodes the instructions but creates references for each memory address and what kind of instructions are accessing it (and of course showing it to us), it’s fairly easy to spot the 16-bit addresses.

So we can tell the tool to convert that data address into a word (dw or dc.w in civilised assembly).

That way the initial value (if any) will be byte swapped by the disassembler and then the assembler will find it in its correct format. So if we tell the 68000 to read a 16 bit value and it will be read correctly in RAM. It goes without saying that the above is very important for initialised values but useless for zeroed values.
Another bonus we get by using this conversion is that we don’t have to worry about odd memory accesses. Remember that the Z80 can read a 16bit word from any place in RAM but the 68000 is restricted to even addresses only. Converting those labels to dc.w means that the assembler will auto-even the address for us, even if it happened to land on odd address originally.
Memory model
Okay, so we have our emulated registers, we reasoned about how to read and write to the emulated Z80 RAM. But where does this RAM actually live? And how can we access it without much hassle?
First of all the Z80 can only access 64k of RAM, assuming no bank switching occurs. So this is actually rather easy - just reserve a 64k block and restrict all access inside that block. So, a typical load from RAM, “ld a,(hl)” (which loads a 8 bit value from the address pointed by HL into A) would look like this in 68000:
move.w reg_hl.w,d0
move.b (a6,d0.w),reg_a.w
This works with the assumption that a6 points to the start of the emulated RAM. Sadly though, it is wrong. (I hope you caught the reason). (a6.d0.w) sure enough will instruct the 68000 to add d0.w to a6.l and read from the resulting address. But the offset added (i.e. d0) is signed - which means that any offset after 32k will result in reading negative compared to a6, which is out of the block we reserve for emulation! There are a couple of options here, the one that looks more attractive if we want to keep the .w part is to store the memory flipped, i.e.place a6 inside the middle of our emulated RAM buffer (i.e. 32k from the start). So then any (a6,d0.w) access will happen inside our block, but the first 32k will be stored after the last 32k. Not a lot of thought went into this path, but it seemed very probable that side effects would appear at some point. Not to mention that debugging things would be awkward to say the least. So a decision was made to simply use a 32-bit offset in d0. Thus we get:
move.w reg_hl.w,d0
ext.l d0
move.b (a6,d0.l),reg_a.w
Ewwww, .l offset! And double eeeeewwwwwww, what’s that ext.l doing there? Fortunately it’s easy to get rid of that - if we ensure that the upper word will always be 0 then there is no need for sign extension. This is easy to do of course because we never do anything with the upper words for our emulation since the highest value we store is 16 bit! Therefore if we simply zero d0 before we jump on the emulated code we’re in business.
move.w reg_hl.w,d0       ; assuming that high word of d0=0
move.b (a6,d0.l),reg_a.w
(by the way, did you notice that ext.l sign extends d0.w instead of zero extend it, which is not what we want? So we would be back where we started, but with an extra instruction! To be correct we’d need a and.l #$0000ffff,d0 which is even worse!)
Status register
The above example doesn’t look that bad all things considered, right? Sure it’s a bit ugly but not that bad. Now, watch what happens next.
(Careful readers probably heard the warning sirens from the comparison table, and by reading the title of this section they took cover and waiting for the explosions)
So how bad is having different behaviour between the two Status Registers?
First of all, loading and storing does not affect Carry, Zero or Negative flags on Z80. The inverse happens on the 68000, so for all memory accesses we have to protect the SR from getting corrupted:
move SR,d7               ; save SR temporarily
move.w reg_hl.w,d0       ; assuming that high word of d0=0
move.b (a6,d0.l),reg_a.w
move d7,SR               ; restore SR
Multiple bad things happen then:
- We waste a register for swapping the stack in and out
- By doing that kind of swapping we introduce delays
- On a CPU like the Z80 loads and stores in RAM are pretty common since registers are in shortage
So that doesn’t look that hot. For the last point one could argue that programmers can use the stack to store swapped out values temporarily. This however does not change our situation much because on the 68000 the same exact behaviour happens on the stack register as well.
While we’re at it, let’s mention some further complications.
- On the 68000 the Carry flag is not preserved in non ALU instructions. Probably for this reason Motorola introduced the eXtend flag, which acts exactly like the Carry flag but is not affected by any instructions except those that use X specifically. For example addx, subx, negx etc.
- On the Z80 instructions and/or/xor clear the Carry flag. There is no way to do this on 68000 (I could be mistaken but I think not). Of course Zero and Negative flags are affected on Z80. So the and/or/xor happens, then the SR is copied and carry/extend bits masked out, if required (remember that on 68000 X follows C), then written back to SR
- On the Z80 inc and dec do not affect the Carry flag, so on the 68000 the SR has to be copied before the operation in order to save X and C (the rest of the bits have to be masked out), then the actual instruction happens, then the new SR is copied to another registerd and masked for C and X, then the two SR copies are merged together, and only then the new value can be copied back to SR.
At this point after taking into account all these rules the code has become super bloated and quite unredable. Also it has made us really sad. Unfortunately there’s not much that can be avoided, unless there is some trick that was not considered. One observation here is that there are a lot of useless moves to SR after each instruction. We can do away with those if we decide to keep the live value of SR in a register instead and load it to SR only when required. Which means mostly ALU and compare instructions. Accessing RAM (which like we claimed above is quite a large chunk of the instructions) is rid of SR swapping though, which is actually great.
By all means this isn’t perfect. In fact a typical compare and branch snippet like:
cp a,6
bnz somelabel
becomes
cmp.b #6,reg_a.w
move sr,d7
move d7,sr
beq somelabel
Yuck. Perhaps a post processing tool can remove that ugliness, but this was defered for a later stage, when and if it would be needed.
Also, the Z80 has conditional jump to subroutine and return from subroutine:
call status bit,address
ret  status bit,address
These become respectively:
move d7,sr
beq.s *+8
jsr <address>

move d7,sr
beq.s *+4
rts
Notice the use of jsr there. Since 68000 instructions are generally twice as big than Z80 instructions and on average we’re using more than one instruction to emulate a Z80 instruction, offsets can exceed +-32 kilobytes. So jsr it is and we get more sad.
“Compound” instructions
The Z80 also has some interesting instructions that wouldn’t seem out of place inside a macro. Let’s take for example ldir. The description for the instruction goes like this: “Repeats LDI (LD (DE),(HL), then increments DE, HL, and decrements BC) until BC=0. Note that if BC=0 before this instruction is called, it will loop around until BC=0 again.”. Notice that almost all main registers bar the accumulator are affected (cpir probably holds the high score of all registers used!). This gets converted to this charming 68k block:
move.w reg_hl.w,d1
move.w reg_de.w,d2
move.w reg_bc.w,d0
lea (a6,d1.l),a0
lea (a6,d2.l),a1
subq.w #1,d0
move.b (a0)+,(a1)+
dbra d0,*-2
sub.l a6,a0
sub.l a6,a1
move.w a1,reg_de.w
move.w a0,reg_hl.w
clr.w reg_bc.w
Notice the .l addressing modes, that we’re pre-decrementing the loop counter, that we’re moving bytes because we have no idea if we’re starting on odd or even address, and that in the end we have to update DE and HL. Thankfully we know that BC is going to be 0 so we shortcut that. (cpir is even more horrible - I won’t mention the extra details here, you can see for yourself once the tool is released!)
DAA
This was one of those instructions where a line was drawn. If the code used that, the whole project would go straight to the bin! Or at least some nasty workarounds would be written in place. Thankfully nothing of the sort happened. Thank God for small miracles.
How does it all fare?
Okay, so we got ourselves totally discouraged. The generated code is a huge mess filled with bloat. It should run like molasses, right?
I can’t really answer that, as the game updates are every 9 frames or so. Without measuring anything I think that the converted code executes at roughly the same speed on a 8MHz 68000 as a 3.5MHz Z80. Again, actual performance tests have to be performed to determine that. But still it’s good for our case because we don’t have to optimise a damn thing!
The Tool
Not all of the above thoughts were decided or even considered before the tool started taking shape. In fact this could probably lead to analysis paralysis, as many paths seem to open at certain points. This tool would have to be written, then check the output, then gain experience from that, then go back and refine or rewrite portions.
Design goals
- Has to convert all the source with as little post tweaking as possible. Zero would be ideal. This is crucial as disassembly is not an exact science. Very few times a raw binary disassembled is fully identified on the first go; sections have to be revisited many times as one accumulates knowledge of the code and data. Of course this is something that will bite us in the botty later on - just make a note here.
- Has to be robust
- Has to report errors - for this I chose to report the errors directly on the translated source, so they would show up with the original source so the problem would be diagnosed easier
- Has to be correct - wishful thinking at the start but hey, it’s something to aim for!
- Should be modular in order to be maintainable - it’s not fun discovering your hex parser has a bug or an omission and you copy/pasted it across the source instead of making it a procedure, just to give an example! (not that this happened of course ;))
- Has to be written in a language that isn’t a pain in the butt for me - so good old GFA32 it is!
Data extraction
Choose your tools carefully
Of course, before the tool itself was written, we’d need to provide it with some source. Which means… disassembly time!
First of all, I had to look around for a Spectrum emulator with a competent debugger. In the end I settled down with Unreal Speccy (see links below) as its debugger seemed decent and full of useful features.
Then I looked for a disassembler. In the past I’ve used the free version of IDA disassembler and I liked it very much. Unfortunately the free version does not have Z80 support (or any of the older CPUs in fact). And I wasn’t going to spend a few thousand euros on a pet project. So I looked around for an interactive disassembler for the Z80 - after all, with such a large user base there surely must be tons of quality tools for it?
Nope, disappointment all round. Very few disassemblers out there, many were half finished or abandoned, and let’s not even go into the “interactive part”…
The only sane option out there seemed to be radare2. But it was a pain in the butt to get running and figuring out how it works. It appears that people that did the UI were influenced by vi. And no, it’s not a typo: the original 70s vi, not vim! So - no visual mode unless you enable it by hand, and all that craziness. The bundled UIs are also a huge mess, broken or not working on browsers (yes, they’re browser based… “great”).
After a lot of searching I found cutter which really seemed what I wanted: something that resembled IDA’s interface and didn’t require the user spending days trying to figure out shortcuts (and then remember them of course!). For a while this was the tool that the disassembly was done.
NSA to the rescue?
Around that time our friends at the NSA decided to grant us with a great boon - a tool called Ghidra was not only released, but open sourced too! And it looked like it’s very close IDA Pro - woohoo! So I wore my tinfoil hat, crossed my fingers and decided to use this for my disassembly endeavours. In less than 30 minutes all my previous labels and comments I had on the cutter project were migrated over and I worked my way from there.
Get me them files
After a bit of reading around about file formats on Spectrum (for example this page) I wanted to extract the actual data from .TAP and .TZX files. Luckily there are quite a number of tools for editing and extracting .TAP files, so this part was fairly easy.
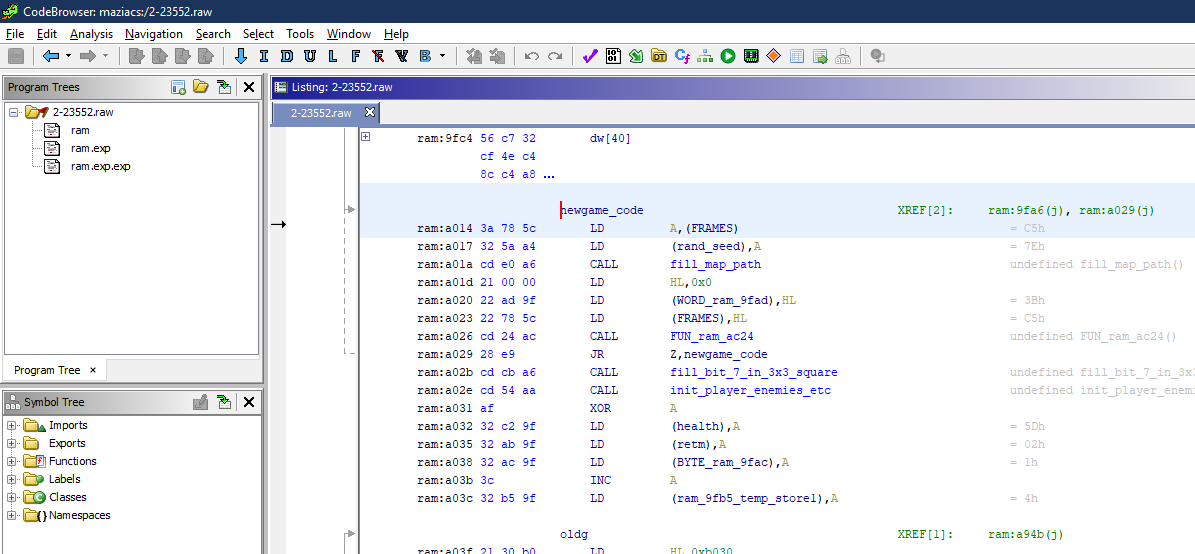
So, I loaded up the main file on Ghidra. Where to begin? One would expect that at the start of the file there’d be some setup code, or a jump to setup code. The usual stuff. But instead of that, the opcodes were pretty much garbage. Also, trying to trace the code after it loaded on memory was quite weird, as the emulator would execute some routines in low RAM, outside the area where the binary was supposed to load.
Did I miss some files from the .TAP file? Or perhaps something more sinister was happening?
Basic stuff????
This was getting really confusing, but I had an idea of what would be happening. So I found a memory map of the ZX Spectrum and noticed that the loading address of the game (5C00) was overwriting some system variables. One of these is:
5C53: PROG - Address of BASIC program
Jeeeeeeeeez, as if things weren’t complicated to begin with, there had to be a BASIC stub that was essentially the menu front end! Of course I could progress on the disassembly a bit because I could see which addresses were being executed ingame, and I did that to some extent. But I also wanted to know where the BASIC program starts and ends so I can tell apart BASIC tokens from main game tokens.
Some searching later and I discovered a tool that can extract BASIC listings from tokens. Luckily I fed it the binary file and it did its magic just fine!
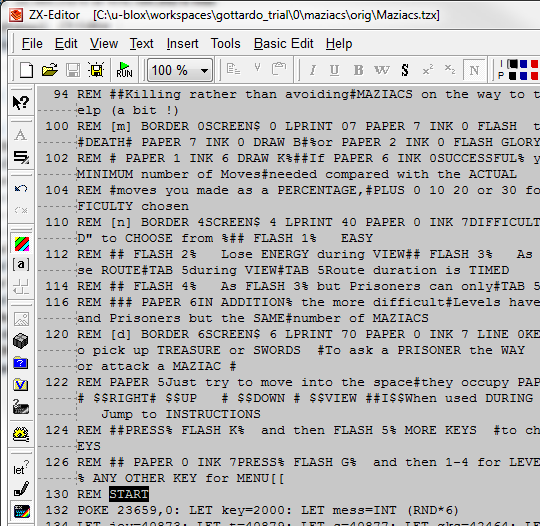
After I extracted the listing at least I had the assembly entry points, so I could finally be more confident on my disassembly. In parallel I was thinking of what to do with the BASIC listing. A few options were visible:
- Just hand convert it to assembly and add any other utility functions along the way. The listing wasn’t massive so it wouldn’t be too hard
- Write something simpler from scratch - who needs menus anyway!
- Cannibalise one of my earlier projects, RB+, which contains a BASIC to C translator (courtesy of bcx) and use/adapt it to convert and compile the code.
The last option was really tempting but it was scrapped as there were so many other fires that had to be put out - it’d be pretty hard to invest a lot of time on such a tool with so little payoff.
The actual work
So after all that faffing about, it was time to make some actual progress! This means identifying parts of the raw binary.
First, what is code and what is actual data (never mind sorting out the BASIC listing!).
Then from the data:
- Discover where are the graphics
- Find any audio
- Find out about the game’s structures, initialised values etc
And of course finding key points in the code. Here some knowledge of the hardware is essential
- Where does the game check for user input? Luckily Maziacs used ROM routines, so looking around for some addresses helped with that
- Where does the game draw graphics? The ZX Spectrum has a fixed screen buffer so that was also not too hard to identify. Although trying to emulate and covnert the screen format into native ST would be too slow. But that was never the intention here, there was a plan for this from the project’s start.
- Where does the game play audio? The game used the beeper to play all sound effects, and the beeper is accessed from the Z80 using a port. So, after searching for OUT instrctions a single routine was found that had quite a number of XREFs, i.e. other places in the code called this one. Since the converter didn’t output anything when an OUT instruction was encountered, this was left in peace.
After enough info was gained on the code, a light stub was written that contained ST specific code that could set up the environment and call emulated Z80 code. One by one the procedures that were hardware specific were plucked out and replaced by native (and quite faster) code.
All the above of course was an iterative process - some native code would be written, then a procedure would be replaced, then tested to see what happens. Perhaps there were bugs in the native routines, or the converter had a bug that produced wrong code, or simply I misunderstood what that routine was doing.
Verification
I really wish I could find some sort of test suite to check all Z80 instructions. I did find a couple of them around the internet (like this) but it seemed too much of a hassle to get working, considering I had no working I/O or anything that could yank me off my neck and show me the error. So I opted for a less refined way to do things:
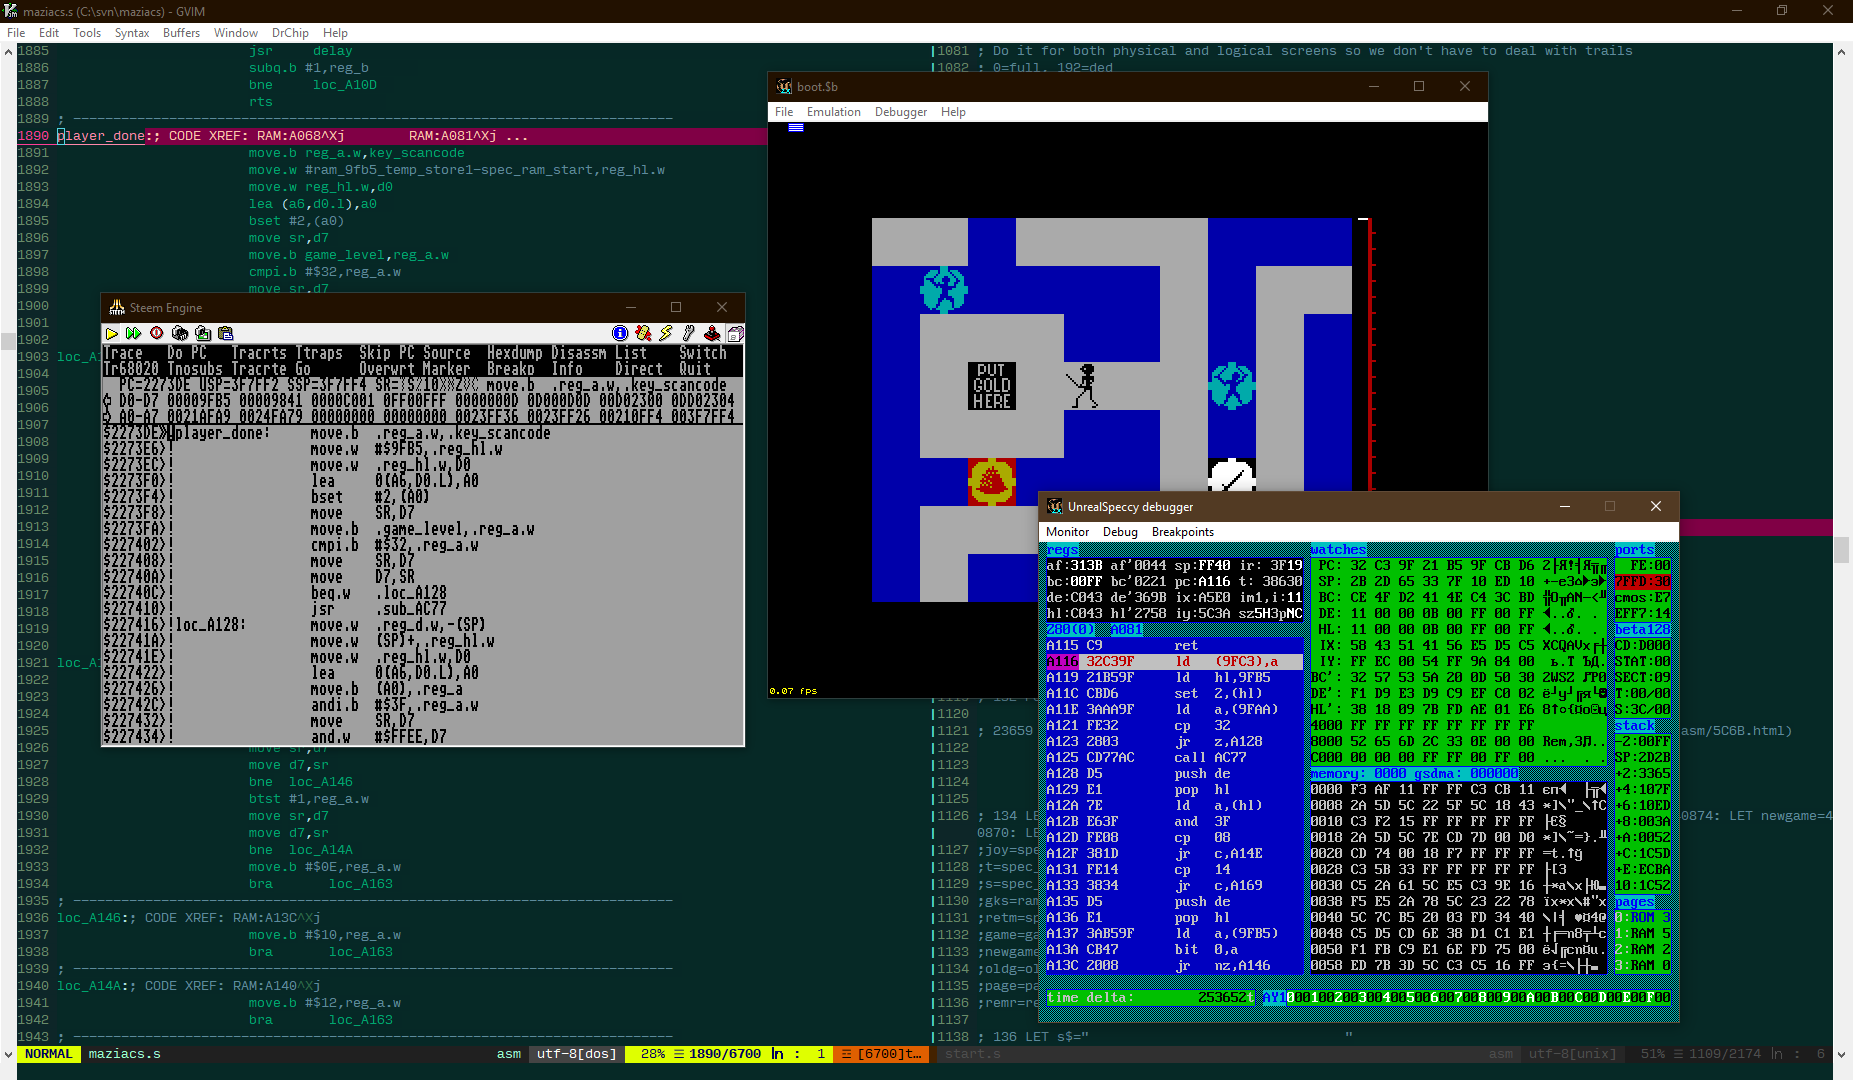
If you can make out the screenshot, this is what my verification workflow looked like. A copy of Unreal Speccy and STEem engine, both tracing the same snippet of code, and comparing results. And that really worked fine. I was aware of some other converter tools (especially Mariusz’ Z80 to 6502) that could run 6502 converted and Z80 snippets in parallel and report any errors. I’m pretty sure this would have helped in a few cases here and there but I think it would have been overkill for me. Tracing in parallel was good enough for me!
Graphics
It’s always rewarding to see something you wrestled for a good chunk of time come to life! Below you can see the first GIF I made after the game actually started doing some stuff instead of just looking at opcodes:
Like mentioned above, anything that the ST version draws on screen is not based on the original code at all. Using the original code would have been too time consuming and would also be problematic for expansion. For example, what if we wanted to replace all graphics with ones that are more colourful? So it was decided early on that the original graphics would be ripped from the binary, then converted to ST format, then a native routine would take over and draw the part of the visible map.
It really was simple to do, as the original routine redrew all the play area every time. Also everything was included inside the map including player position etc. Some extra work was required to add animating frames and cater for displaying the proper frames of the player but the original code had all the info, it was a simple matter of porting that logic over.
Frame rate
The original game updates the screen every 9 frames approximately. Of course it’s not that slow, but a pause was introduced because without it the game would be too fast even on the Spectrum. The original code solved this by introducing a software pause (2 nested loops if I remember correctly).
Now, I could just follow this on the Atari - add a pause loop that waits for sort of the same time, but this would introduce all sorts of weird problems, especially when the game would be run on faster machines like the TT or Falcon. So, the ST version counts time by reading a timer instead.
I/O
The game’s input needs are rather simple, just poll the keyboard or joystick and see if something was pressed and act accordingly. The original game only uses the one or the other input method but hey, we’re nice people so on the ST we check for both simultaneously.
In order to avoid reinventing the wheel and having to deal with weird issues, dml’s routine from AGT was brought into the project. That way we get proper keyboard handling (including keyboard break codes etc). So this was quickly wired up and then left in peace. Or so it seemed…
Audio
This was one of the last things that was worked on, regrettably so. Firstly because the sound effects were done at the last moment (thus sounded a bit meh), and secondly… I still won’t spoil that surprise. Keep reading.
The original idea was for me to write to the YM2149 directly and create some small routines that oscillated between notes or add noise/envelopes etc. But then real life things happened and issues kept piling up, so this was getting pushed back.
UI
As said above, when time started pushing and nothing that even remotely resembled a user intrerface was in there I just took the plunge. Basic code went inside the assembly source code, converted line by line into assembly and all supporting subroutines coded.
There were many issues with it even at the last moment, with the weirdest one a pause while the intro sound was playing. It shouldn’t take too long to do what it’s supposed to do (“rotate” the company logo palette a bit and play a sound) but it took ages. Weird.
Bring in the Arkos
Then it dawned on me - I could use Arkos Tracker 2 to create the sound effects and then play them ingame! Yay! There were only a couple of problems with that approach:
- The replay routine I ported in 2018 does not support sound effect triggering. I discovered that way after the player conversion and there was no time to port another player now. (Of course, having the converter now means I can probably port the other players easier, they’d just be less optimal)
- Learning how to make sounds on the YM using the instrument creator of a tracker at the last minute? Well, some sounds will be created but they won’t be that great.
Of course, some sound > no sound, so mediocre sound effects it is. It was so much fun looking at people’s reactions during Outline when I would play the sound effects for the first time to them!
When things go wrong
As expected, in such a complex project with so many points of failure, things could go spectacularly wrong. And they did. Here is a small selection of the most interesting issues that were fixed.
Game freeze at map generation
Oh my, that was fun. It was at the point that I was fairly confident that the emulated 68000 code matched the Z80 code. I spent a few days tracing the map generator, even getting the pseudo number routine bit exact, plus a lot of other tracing. So I got bored and thought I’d let it run all the way, see if when/if it crashes. So I did that and…
Nothing. It just froze.
That was underwhelming to say the least. Not that I had many expectations, but if it could diginfy me even with a crash it’d be nice. But nah, just nothing. Eventually the issue was found. When generating the map, the game has no exit condition. Instead a timeout counter is introduced and once this is exceeded then the map is deemed to be “good enough”. In practice I’ve never seen it generate a non solvable level, but who knows! I set an equivalent timer on the ST to count roughly the same amount of time as the original and left it as is.
Odd address?
Another weird issue, Ghidra could not understand it either. So after the code reached a certain point after startup, I got an address error. The debugger said that the Program Counter was set to an odd address.
Great.
This could mean a multitude of things, from the disassembler being broken, to the code disassembled was not code but data (unlikely but still), to the assembler being broken, to the converter being broken, etc etc. A quick investigation showed that the problem was actually happening at the original Z80 code. The program flow actually jumped on an instruction inbetween 2 instructions.
This is possible because the Z80 PC can be pointed to any address in RAM and any byte can be decoded into one valid instruction. In that case it just happened that the instruciton that the (possibly wrong) jump was not altering the program in any way, so it was harmless. But for us it was a disaster!
Instead of changing the code in the converted source I opted to patch the jump at runtime since the converted source could be re-generated at any time, so the fix would have been lost.
Condition codes
After things got well under way, the player could move, animate, encouter with monsters etc. For the most part everything looked fine. But some times various graphic glitches would show up, logic would get screwed up and so on.
This was a really weird issue that troubled me for quite some time, mostly because I had to devise a reproducable test case and then trace side by side and see what’s happening. Eventually it was traced to a jp c,** command. When I wrote the conversion code for all jp instructions I did all the matching of condition codes from Z80 to 68000 in a hurry, and left a mental note to revisit these and audit them a bit. Well guess what, I never did! So jp c,** was mapped to bra.s **, which was, errr, super wrong.
So there, go back and audit your code or otherwise suffer the consequences.
IKBD
Another long standing issue, and a quite embarrasing one to be honest: joystick controls would very frequently lock up, especially with sudden moves or fire button presses. This really gave me a lot of grief as the code was very clean and almost interrupt free, so this shouldn’t happen. But it did. As a super bad workaround I added some sentinel code that would check for these lockups and reset the keyboard tranceiver chip. On the upshot this made me transcribe the relevant manual on this very site.
But still I was never very happy with this solution, but I really had no ideas why this happens.
Fight to the end
A much more subtle bug happened during fights: they appeared to last much longer than the original game’s. This was quite troublesome to find as the fights weren’t lasting the same amount of time, so anything could be at fault there. Immediately my suspicions went into the converted code: perhaps something was broken that made the random number generator? A quick check showed that this was fine, so what was happening?
As it turned out, the problem was two fold. First, the routine that determined the fights would read the seed from the random number generator routine. But that value is 16bit and the fight routine read 8 bits. Which meant it would read the wrong bits due to endianess. That was… not so great as it seems. So that access was patched to read the proper bits instead.
But there was still an issue, which was found by accident. The code executed a add e,a, which was not catered for during conversion. So the converter would default to another code path that actually loaded the wrong register, and really that didn’t help things!
Audio farts
Careful readers might have noticed by now that I’ve been leaving some hints here and there (some breadcrumbs if you will) about a major problem. Well, time to pull the curtains on that then.
A week before the party I decided that enough was enough - I simply had to get audio working because a party release without audio is quite sad. So I dropped the player routine inside the project, fired up Arkos Tracker 2, made some test noises and then exported them to the game. Then I ran the game and waited to listen to the “intro” instrument I made.
And instead, I got fart noises.
Now, I know that people say that all that YM2149 outputs are in fact fart noises (to quote someone who shall not be named here: “It’s an I/O controller that accidentally outputs audio”) but this was a right cacophony.
I was gutted.
First thought was to scrap audio entirely. But then I started thinking. Why did jumping in the Z80 intro take so long to execute? It should take 1 or 2 frames tops. Well, I thought, it flips some attributes and… plays sound?
Wait.
That’s the one routine I never noticed much. But how much CPU time could that be taking? So I took a look at the routine… and slapped myself.
I’m really not that versed in the ZX Spectrum hardware but I can guess that when you’re bit banging a port to produce audio (which is what they do with the beeper), it’s probably a good idea to have a stable rate to send the commands over. Which of course means turning interrupts off and on. Which is what the Z80 code does. Aaaaaaaand, in my over-zealousness, these opcodes were translated to actual instructions that did that on the MC68000.
D’OH!
Immediately everything clicked: the broken keyboard/joystick code, the delays in the intro, the weird framerate delay. All because I allowed DI and EI to be translated to valid Motorola code. Hooray for completeness! FML :(
Anyway, confidence restored, routine replaced by ST code that called Arkos replay - many problems sorted in one sweep.
Now we were ready to party!
The party
30th May to 2nd June 2019 In Willemsoord, Netherlands - that was where and when the party happened. Arriving there the game was still in its original graphics, a couple of sound effects were made (some at the flight over to the party even!) and the UI was mostly working but not quite there yet.
(Well, “original graphics” isn’t exactly true. TiNKer had indeed started pixelling sprites before the party but they needed a lot of work. Plus I asked fellow Bello Gamer SH3 one day before the party if he could take the title pic and Bello it up a bit. He immediately agreed and this is the result:
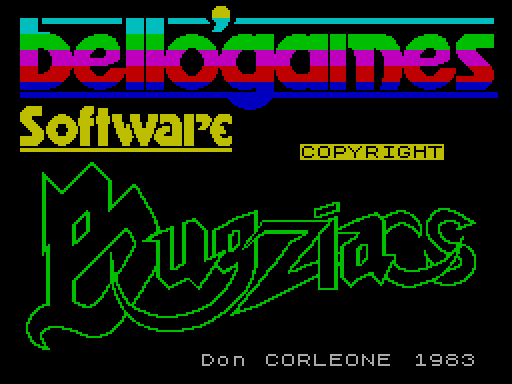
Thanks Kev, you’re a star! That conversion made me chuckle for one day, probably even in my sleep!)
Party fixes
What would a party be without our favorite activity - party coding? After arriving at the place and meeting up with the people, the coding began. Here are some noticable things that were fixed during the party.
Random number generator: redux
This time instead of battles taking too long, the player could win any battle, even without carrying a sword (which was statistically impossible!). Argh! Worked around that one.
UI
As said, many many little details need to be fixed, and they were. A few still remained, but it was good enough for a party version.
Graphics
TiNKer really came through at the party. Perhaps the fact that we weren’t sitting next to each other probably helped him to focus and speed paint everything! (we really rip into each other when we’re talking so we probably wouldn’t be that productive!)
![]()
Notice the little touches he put in there, like the bottle of Grolsch instead of food (yay, drink beer to get energy, and probably get stone drunk!) and “PUT FANTA HERE” instead of gold! (for those who never went to Outline, Fanta has become the de facto prize at the party - as for the reasons, well, you’ll have to find that out for yourselves)
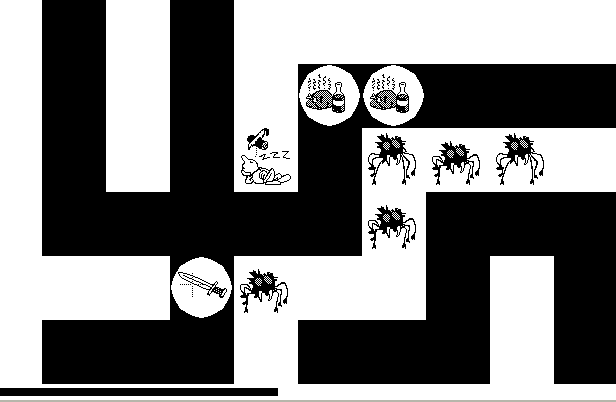
2 tilesets
One thing I never got round to implementing until the last moment is the character transparency. In the original game when the player touched a prisoner in the wall, a yellow path would show the way to the treasure or the exit (depending on if you got the treasure or not). This is very easy on the Spectrum due to attributes - you just change background colour for the relevant 8x8 pixel blocks and the hardware does everything automatically for you. However on the ST we don’t have such luxuries. This meant we had to have 2 tilesets, one with the “normal” background and one with the “path highlighted” background.
This was quite low on my list of TODOs but we managed to include it for the party version.
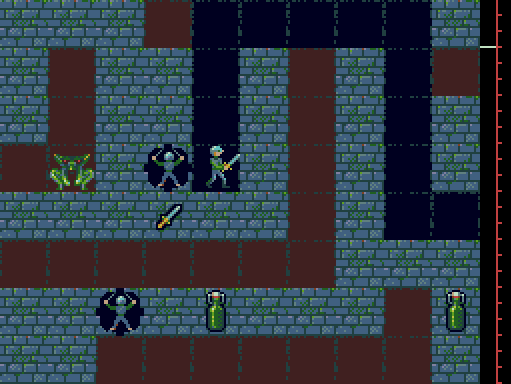
In the screenshot above you can see the brown “normal” tiles and the blue “path to riches” tiles.
In conclusion / takeaways
Bugziacs was presented at the party and ranked second (hooray!) in two entries total (err, woohoo!). You can visit pouet.net and grab the binary or comment if you like.
The final still needs a few things fixed and more testing is required on all Atari machines to ensure it works properly. But it still felt great to release it after all this work put into it :).
Also, I do intend to release the conversion tool really soon, I just need to take care of a few things first.
Some takeaways then:
- Despite all differences, the ST hardware isn’t that different to the ZX Spectrum. In both you get a CPU, screen buffer, something that does audio, no fancy hardware, and then you’re left alone trying to make something that looks decent
- Once again I reminded myself how much 8 bit CPUs honour the byte as a unit. It’s something that 16/32 bit CPUs like the MC68000 often forget or omit entirely
- Never forget that friends are there to help when you’re stuck in a rut - asking for help even at the last moment can pay dividends
- Despite everything, party coding is still fun!
- Visit demo parties, meet lots of nice people, have fun!
- Solve complex prolbems by starting typing things. You might not be an expert at it but as you work on them you gain experience and even if you fail you gain a lot from that experience and you do better next time. (The Arkos Tracker 2 player port was ultimately restarted midway as I had a much better grasp at what the hell was going on compared to when I started it)
- As the article’s title says, I still do think Z80 is crap and I’m really glad the converter enabled me to do ST coding instead :).
- This conversion doesn’t have to be ST specific - since it’s MC68000 code and all routines that need to be patched are gathered close, it can be ported to other 68k machines provided some utility code is written: Amiga, Jaguar, Megadrive, X68000, etc - all doable!
Appendix
“Thank you"s
- SPKR of SMFX for bringing this game into my attention and constally pestering me to finish the damn port!
- TiNKer of Lineout for his amazing work on graphics at the last minute
- SH3 for changing the author name (after my suggestion) in the title screen and making me chuckle uncontrollably for at least 2 days
- Targhan of Arkos for the tracker (of course!)
- All the lovely people I met and talked to at the party: Beetle, TiNKer, Tronic, Gaz, LFEE, Grazey/Showaddywaddy, SPKR, tIn, Harekiet, Fra, Havoc, Felice, Gasman and all the rest of the happy people!
- Outline organisers (and yes I already mentioned Havoc above but hey!)
Z80 links
During development I have gathered a few web pages that were kept around and were quite handy. So here they are for anyone wanting to dig into this subject a bit:
| Link | Description |
|---|---|
| http://clrhome.org/table/ | Invaluable resource, one of the most used pages during development. Opcodes are nicely sorted in tables and hovering the mouse over a specific instruction an explanation of the opcode is shown. The same server also hosts a handy online assembler |
| https://www.asm80.com | Fantastic online assembler and debugger. Takes a small amount of time to learn but the ability to assemble and step through listings is just too good |
| Unreal speccy, TS-Config version | This version was used a lot because it uses a Windows interface by default, plus the emulator contains a very powerful debugger |
| Spectrum ROM memory map | Another invaluable resource, explaining all ROM routines and addresses one by one in great detail. |
| z80 heaven | Another great reference for Z80 stuff. Also contains a nice explanation of the Z80 registers |
| http://www.z80.info/z80syntx.htm | Can’t have too many of Z80 references! |
| L BREAK into program, 0:1 | A quick explanation of the ZX Spectrum memory layout |
| Overtaken by events | And another one, this is a bit more comprehensive |